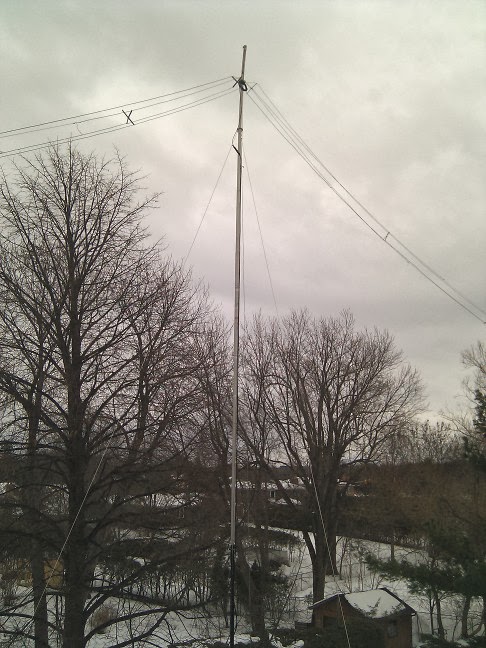
 With the recent thaw the rebuilding effort is complete, as the accompanying picture demonstrates. I'll take you through the steps I took.
While waiting for a mid-winter thaw that stubbornly failed to materialize I did what analysis I could of what went wrong and how to rebuild it so that it would last. There were two contributing factor that I was able to determine:
- The two sections of 4' nesting army surplus fibreglass mast were not able to withstand the bending stresses to which they were exposed. These were located at the bottom of the mast, nesting within the 6 meters long house-bracketed Schedule 40 steel pipe and supporting the 6 meters aluminum mast (a re-purposed yagi boom). I was attracted to the mast since I had it and it had just the right dimensions to fit the pipe and aluminum mast with a single layer of aluminum shim (roof flashing). In particular, the weak point was the neck of the small-diameter protrusion that nests within another mast section.
- The back stay that holds the mast vertical (in opposition to the weight and tension of the raised antenna) is dacron rope. It is more than sufficiently strong in this application. However it does exhibit some stretch even if dacron stretches less than many other rope materials. This made it difficult to reliably set the tension in the stay. Even then the mast would move in the wind, and more in high winds.
 Version 2.0 of the mast addresses both problems. First, I replaced the fibreglass with an 8' length of 18 gauge galvanized steel fence post. Although I made a modest effort to see what the local stores had in the way of suitable conduit, pipe and fencing steel there was nothing of a size that was a good fit to both the aluminum mast (1.5" OD and 1.375" ID) above and the steel pipe (1.61" ID) below.
For the bottom fit I used several layers of aluminum flashing as a shim to raise the fence post's outer diameter of ~1.4" to be a close but not too snug fit to the pipe. Some play is necessary since it is difficult to insert the mast when you have are holding the entire 8.5 meters length of mast above your head while it wobbles in the wind and balancing on the edge of the roof. Safety lines ensured that I would not be injured but it is still a tricky operation.
I used a circular saw with an abrasion disk to cut two slots at the top end of the fence post. A smaller diameter steel pipe with (more) aluminum shim was placed within the post and then compressed with a muffler clamp. The shim and inner pipe also fit within the aluminum mast for a snug press fit. A steel hose clamp was tightened at the bottom of the mast to strengthen (but not compress) it at this stress point (see below).
 All of this fabrication was done indoors, where I was snug and warm. I used a plastic Schedule 40 pipe with the same dimensions as the steel pipe as a proxy for the fitting. The end section of the aluminum mast was brought indoors for the same purpose.
The second problem was simply addressed by replacing the dacron rope stay with ⅛" aircraft cable. Although the cable does not stretch some pre-load is needed to ensure the mast stays vertical when the tension of the antenna pulls the stay taut.
The picture above is not too detailed but hopefully it is clear enough to see the couplings. A close-up of the top of the post is visible in the picture at right.
The clamp at the bottom of the fence post holds the aluminum shim in place and serves as a mechanical stop to ensure the post slides into the pipe the correct distance. In the middle of the post the protrusion you can see in the first pictures is a rope cleat that makes it easy to secure the antenna pulley rope in a couple of seconds. Previously I had to tie the rope to a bracket or clamp. This was too time consuming since the antenna went up and down multiple times to tune the antenna and make mechanical adjustments.
The operation to install the new mast took 3 days. More precisely the elapsed time was 3 days although the work involved was only a couple of hours.
- Day 1: Shovel the snow off the section of the lower roof where I need to walk and to place the ladder to access the upper roof. I also shoveled what parts of the upper roof that were accessible from the lower roof. The above-freezing temperature did the rest over the next day.
- Day 2: Assemble the mast in the driveway (it's much too long to fit within the garage), carry it to the site and swing it vertical. Since all the steel is at the bottom the extra weight is not an obstacle to this operation. However it still takes some muscle to flip up a long mast from one end. All the ropes and cables are tied or taped to the mast in the reverse order they will be released once the mast is in place. Go onto the upper roof and do more shovelling of work areas. Wait several hours for the weather to melt the remaining layer of slush and ice. Finally, raise the mast, tension the stay and attach the pulley rope to the antenna (which I left hanging where it was on the roof after cutting it free of the failed mast). Make adjustments to the antenna spreaders that had collapsed during the mast failure and raise the antenna into the air. Connect the coax, cross fingers and load it up. Hey, it still works!
- Day 3: Clean the rest of the ice off the antenna tie-down ropes and adjust the tension on the stay. Raise the antenna to its full height, tie everything down and seal the coax connections. Get everything done just as the thaw comes to an abrupt and cold end.
With that major repair operation taken care of I climbed the tower to turn and retighten the TH1vn multi-band dipole to its mast. A couple of strong wind storms spun it so that it favoured the polar paths, but put Europe in its side node.
This spate of mid-winter antenna work should suffice for the rest of the winter, including the upcoming ARRL DX contests.
No comments:
Post a Comment
All comments are moderated, and should appear within one day of submission.